We think Nomad has the potential to become a very useful tool in your toolbox and therefore I would like to take this opportunity to introduce to you my thoughts alongside a guide on the basic setup.
- 1. What is Nomad
- 2. Key Features
- 3. Architure of our first Nomad deployment
- 4. Installing a Nomad Server (Ubuntu)
- 5. Installing a Nomad Agent (Ubuntu)
- 6. Our first impressions
1. What is Nomad
Nomad is a flexible scheduler and workload orchestrator that enables an organization to easily deploy and manage any containerized or legacy application using a single, unified workflow. Nomad can run a diverse workload of Docker, non-containerized, microservice, and batch applications.
Nomad enables developers to use declarative infrastructure-as-code for deploying applications. Nomad uses bin packing to efficiently schedule jobs and optimize for resource utilization. Nomad is supported on macOS, Windows, and Linux.
2. Key Features
Deploy Containers and Legacy Applications: Nomad’s flexibility as an orchestrator enables an organization to run containers, legacy, and batch applications together on the same infrastructure. Nomad brings core orchestration benefits to legacy applications without needing to containerize via pluggable task drivers.
Simple & Reliable: Nomad runs as a single binary and is entirely self contained - combining resource management and scheduling into a single system. Nomad does not require any external services for storage or coordination. Nomad automatically handles application, node, and driver failures. Nomad is distributed and resilient, using leader election and state replication to provide high availability in the event of failures.
Device Plugins & GPU Support: Nomad offers built-in support for GPU workloads such as machine learning (ML) and artificial intelligence (AI). Nomad uses device plugins to automatically detect and utilize resources from hardware devices such as GPU, FPGAs, and TPUs.
Federation for Multi-Region: Nomad has native support for multi-region federation. This built-in capability allows multiple clusters to be linked together, which in turn enables developers to deploy jobs to any cluster in any region. Federation also enables automatic replication of ACL policies, namespaces, resource quotas and Sentinel policies across all clusters.
Proven Scalability: Nomad is optimistically concurrent, which increases throughput and reduces latency for workloads. Nomad has been proven to scale to clusters of 10K+ nodes in real-world production environments.
HashiCorp Ecosystem: Nomad integrates seamlessly with Terraform, Consul, Vault for provisioning, service discovery, and secrets management.
Source: Introduction to Nomad | Nomad - HashiCorp Learn
3. Architure of our first Nomad deployment
We have pre-deployed the below infrastructure using Terraform and, in this blog post, we will cover the installation and configuration of a nomad server and a couple of clients attached with various bare minimum resources. The deployment of the infrastructure itself will not be covered in this blog post, but it can be deployed manually or using any IaC (Infrastructure as Code) tool.
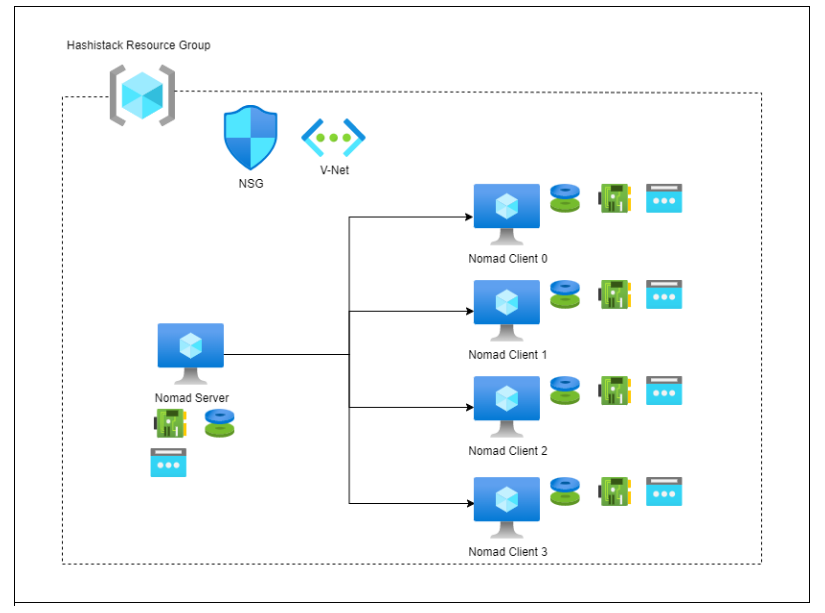
Dig: 1 Basic Nomad Architecture

Dig: 2 Basic Nomad Architecture
4. Installing a Nomad Server (Ubuntu)
SSH into the virtual machine that will be acting as our Nomad Server and run the following commands in order to download and install the Nomad Binary.
※In this example we are using nano but any editor of your choice will suffice.
Execute the following commands and confirm your version of Nomad.
export NOMAD_VERSION="1.2.3"
curl --silent --remote-name https://releases.hashicorp.com/nomad/${NOMAD_VERSION}/nomad_${NOMAD_VERSION}_linux_amd64.zip
sudo apt-get -y install  unzip
unzip nomad_${NOMAD_VERSION}_linux_amd64.zip
sudo chown root:root nomad
sudo mv nomad /usr/local/bin/
nomad version
nomad -autocomplete-install
complete -C /usr/local/bin/nomad nomad
sudo mkdir --parents /opt/nomad
sudo useradd --system --home /etc/nomad.d --shell /bin/false nomad
We will be using systemd to run our Nomad service hence we will be required to create and configure this service.
sudo nano /etc/systemd/system/nomad.service Copy & Paste the below content and press Ctrl + O to save and Ctrl + x to exit.
[Unit]
Description=Nomad
Documentation=https://www.nomadproject.io/docs
Wants=network-online.target
After=network-online.target
[Service]
ExecReload=/bin/kill -HUP $MAINPID
ExecStart=/usr/local/bin/nomad agent -config /etc/nomad.d
KillMode=process
KillSignal=SIGINT
LimitNOFILE=infinity
LimitNPROC=infinity
Restart=on-failure
RestartSec=2
StartLimitBurst=3
StartLimitIntervalSec=10
TasksMax=infinity
[Install]
WantedBy=multi-user.target
After the above setup, it’s time to configure Nomad and specify an identifier for the virtual machine. We will assign it a role to define whether it will be working as a client or server.
sudo mkdir --parents /etc/nomad.d
sudo chmod 700 /etc/nomad.d
sudo touch /etc/nomad.d/nomad.hcl
sudo nano /etc/nomad.d/nomad.hcl
Copy & Paste the following;
datacenter = "dc1"
data_dir = "/opt/nomad"
Replace the datacenter parameter value with the identifier you are using for the datacenter this Nomad cluster is deployed in.
sudo touch /etc/nomad.d/server.hcl
sudo nano /etc/nomad.d/server.hcl
Copy & Paste the following;
server {
enabled = true
bootstrap_expect = 1
}
Replace the bootstrap_expect value with the number of Nomad servers you are deploying; three or five is recommended, but in our demo architecture we are only deploying one Nomad server.
Run the following commands to start the Nomad Server
sudo systemctl enable nomad
sudo systemctl start nomad
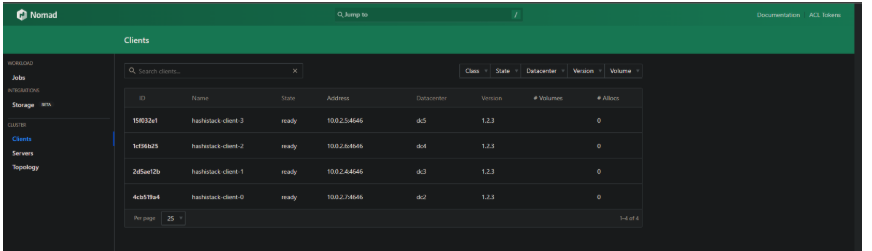
sudo systemctl status nomad Once the above commands are executed successfully, you should be able to visit PUBLIC_IP:4646 and access the Nomad GUI. From here, we can monitor clients and schedule jobs.
Once you have deployed and configured nomad clients, they are visible in the GUI. Currently, it will look something like this, as you have only one server deployed and the client page should indicate that there are no clients detected.

5. Installing a Nomad Agent (Ubuntu)
SSH into the virtual machine that will be acting as our Nomad agent and run the following commands in order to download and install the Nomad Binary.
Execute the following commands and confirm your version of Nomad.
export NOMAD_VERSION="1.2.3"
curl --silent --remote-name https://releases.hashicorp.com/nomad/${NOMAD_VERSION}/nomad_${NOMAD_VERSION}_linux_amd64.zip
sudo apt-get -y install  unzip
unzip nomad_${NOMAD_VERSION}_linux_amd64.zip
sudo chown root:root nomad
sudo mv nomad /usr/local/bin/
nomad version nomad -autocomplete-install
complete -C /usr/local/bin/nomad nomad
sudo mkdir --parents /opt/nomad
sudo useradd --system --home /etc/nomad.d --shell /bin/false nomad
We will be using systemd to run the nomad service, hence we will be required to create and configure this service.
sudo nano /etc/systemd/system/nomad.service Copy & Paste the following content and press Ctrl + O to save and Ctrl + x to exit.
[Unit]
Description=Nomad
Documentation=https://www.nomadproject.io/docs
Wants=network-online.target
After=network-online.target
[Service]
ExecReload=/bin/kill -HUP $MAINPID
ExecStart=/usr/local/bin/nomad agent -config /etc/nomad.d
KillMode=process
KillSignal=SIGINT
LimitNOFILE=infinity
LimitNPROC=infinity
Restart=on-failure
RestartSec=2
StartLimitBurst=3
StartLimitIntervalSec=10
TasksMax=infinity
[Install]
WantedBy=multi-user.target
After the above setup, it’s time to configure Nomad and specify an identifier for the virtual machine. We will assign it a role to define whether it will be working as a client or server.
sudo mkdir --parents /etc/nomad.d
sudo chmod 700 /etc/nomad.d
sudo touch /etc/nomad.d/nomad.hcl
sudo nano /etc/nomad.d/nomad.hcl
Copy & Paste the following;
datacenter = "dc2"
data_dir = "/opt/nomad"
Replace the datacenter parameter value with the identifier you are using for the datacenter this Nomad cluster is deployed in.
sudo touch /etc/nomad.d/client.hcl
sudo nano /etc/nomad.d/client.hcl
Copy & Paste the following;
client {
enabled = true
servers = ["x.x.x.x"]
}
※Replace x.x.x.x with the private IP of the Nomad Server.
Starting Nomad Server:
sudo systemctl enable nomad
sudo systemctl start nomad
sudo systemctl status nomad
Once the above commands have been executed, you should be able to see the clients added in the Web UI provided by Nomad and your initial Nomad deployment is completed.
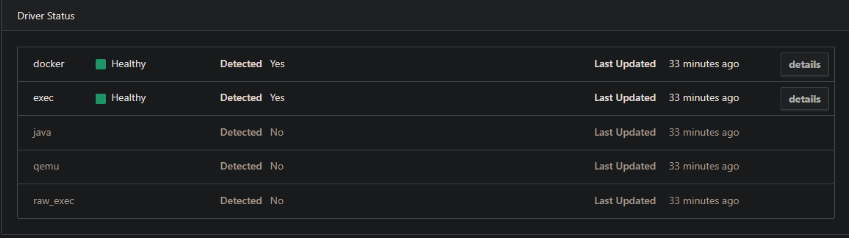
There are currently no drivers installed on the Nomad clients, but you will be able to install various drivers to meet your needs from here on.
In the URL below, you can find more information on how to add specific drivers to your nomad deployment.
Drivers: Docker | Nomad by HashiCorp (nomadproject.io)
For each client, you can also see its system resource utilization in the web UI provided by Nomad Server.

6. Our first impressions
Kubernetes has been around for several years at this point and has proven to be a solid orchestration tool. Nomad, on the other hand, seems to potentially be more efficient in terms of resource utilization as well as more efficient in spinning up large numbers of containers. Another big difference between the two is the cognitive load put on developers in a Kubernetes environment. Nomad, at its core, is very simple to use and deploy.
To summarize, Nomad seems to be the more user friendly solution, but Kubernetes has been around for a while now and has its advantages. For one, most of the major cloud platforms offer Kubernetes managed services.
Azure - Azure Kubernetes Service (AKS)
AWS - Amazon Elastic Kubernetes Service (EKS)
GCP - Google Kubernetes Engine
IBM - IBM Kubernetes Service
Alibaba - Alibaba Cloud Container Service for Kubernetes (ACK)
Nomad currently does not provide such managed services, which could be a crucial piece of the puzzle when considering cloud platforms for production applications. However, you could overcome this drawback by creating images with pre-installed nomad binaries and basic configurations using packer and deploying these architectures with the help of Terraform and the use of the default scaling services provided by the targeted cloud platform.
Another downside is the lack of guidance materials, which are available in abundance for Kubernetes but non-existent for Nomad.
To summarize, it is very exciting to have more tools in our toolbox and to know which solution best fits your needs depends on your project and use cases. It is hard to answer this in a single blog post, but hopefully this will have been useful information in getting you kickstarted in Nomad.
Writer : Sebastian Andersson
Co-writer & Co-Creator : Ketan Singrole